03/07/2019 This post is in the all-time highest ranked posts on Reddit in the r/MachineLearning forum.
03/21/2019 Updates: Amazon links added for all parts. Added Blower-style GPU, faster/cheaper M.2 SSD, and other options.
04/16/2019 Update: A better build is available in this post.
I built a multi-GPU deep learning workstation for researchers in MIT’s Quantum Computation lab and Digital Learning Lab. While hunting online for how to build it, I couldn’t find a blog that was detailed enough to buy every component.
Instead, I found websites to purchase pre-built rigs like the Lambda GPU Workstation. The only problem: they cost $12,500. This is a great machine for top-tier state-of-the-art deep learning research, but not so great if you’re on a budget. That’s why I built my own version with similar or better components for $6200. To help other researchers, I’m sharing the details for every component so you can build one as well.
Even if you are building a smaller deep learning machine or your first computer, you may find the component explanations in this post useful. Throughout, I include examples where you can reduce component costs further.
At the end, I provide time and cost benchmarks of this machine versus a Google Compute Engine (GCE) Deep Learning VM. I used PyTorch’s ResNet50 training on ImageNet to benchmark.
The perfect build?
There is no perfect build because everyone’s needs are different. Even if there was, the perfect build is constantly changing as new hardware is released. This post provides a good build and if while reading this you see an improvement, please comment below!
Every Component in the Deep Learning Rig
Here is my receipt with all components.
I ordered everything online via Newegg, but any vendor (e.g. Amazon) is fine. If you have a local MicroCenter store nearby, they often have cheap CPU prices if you purchase in a physical store.
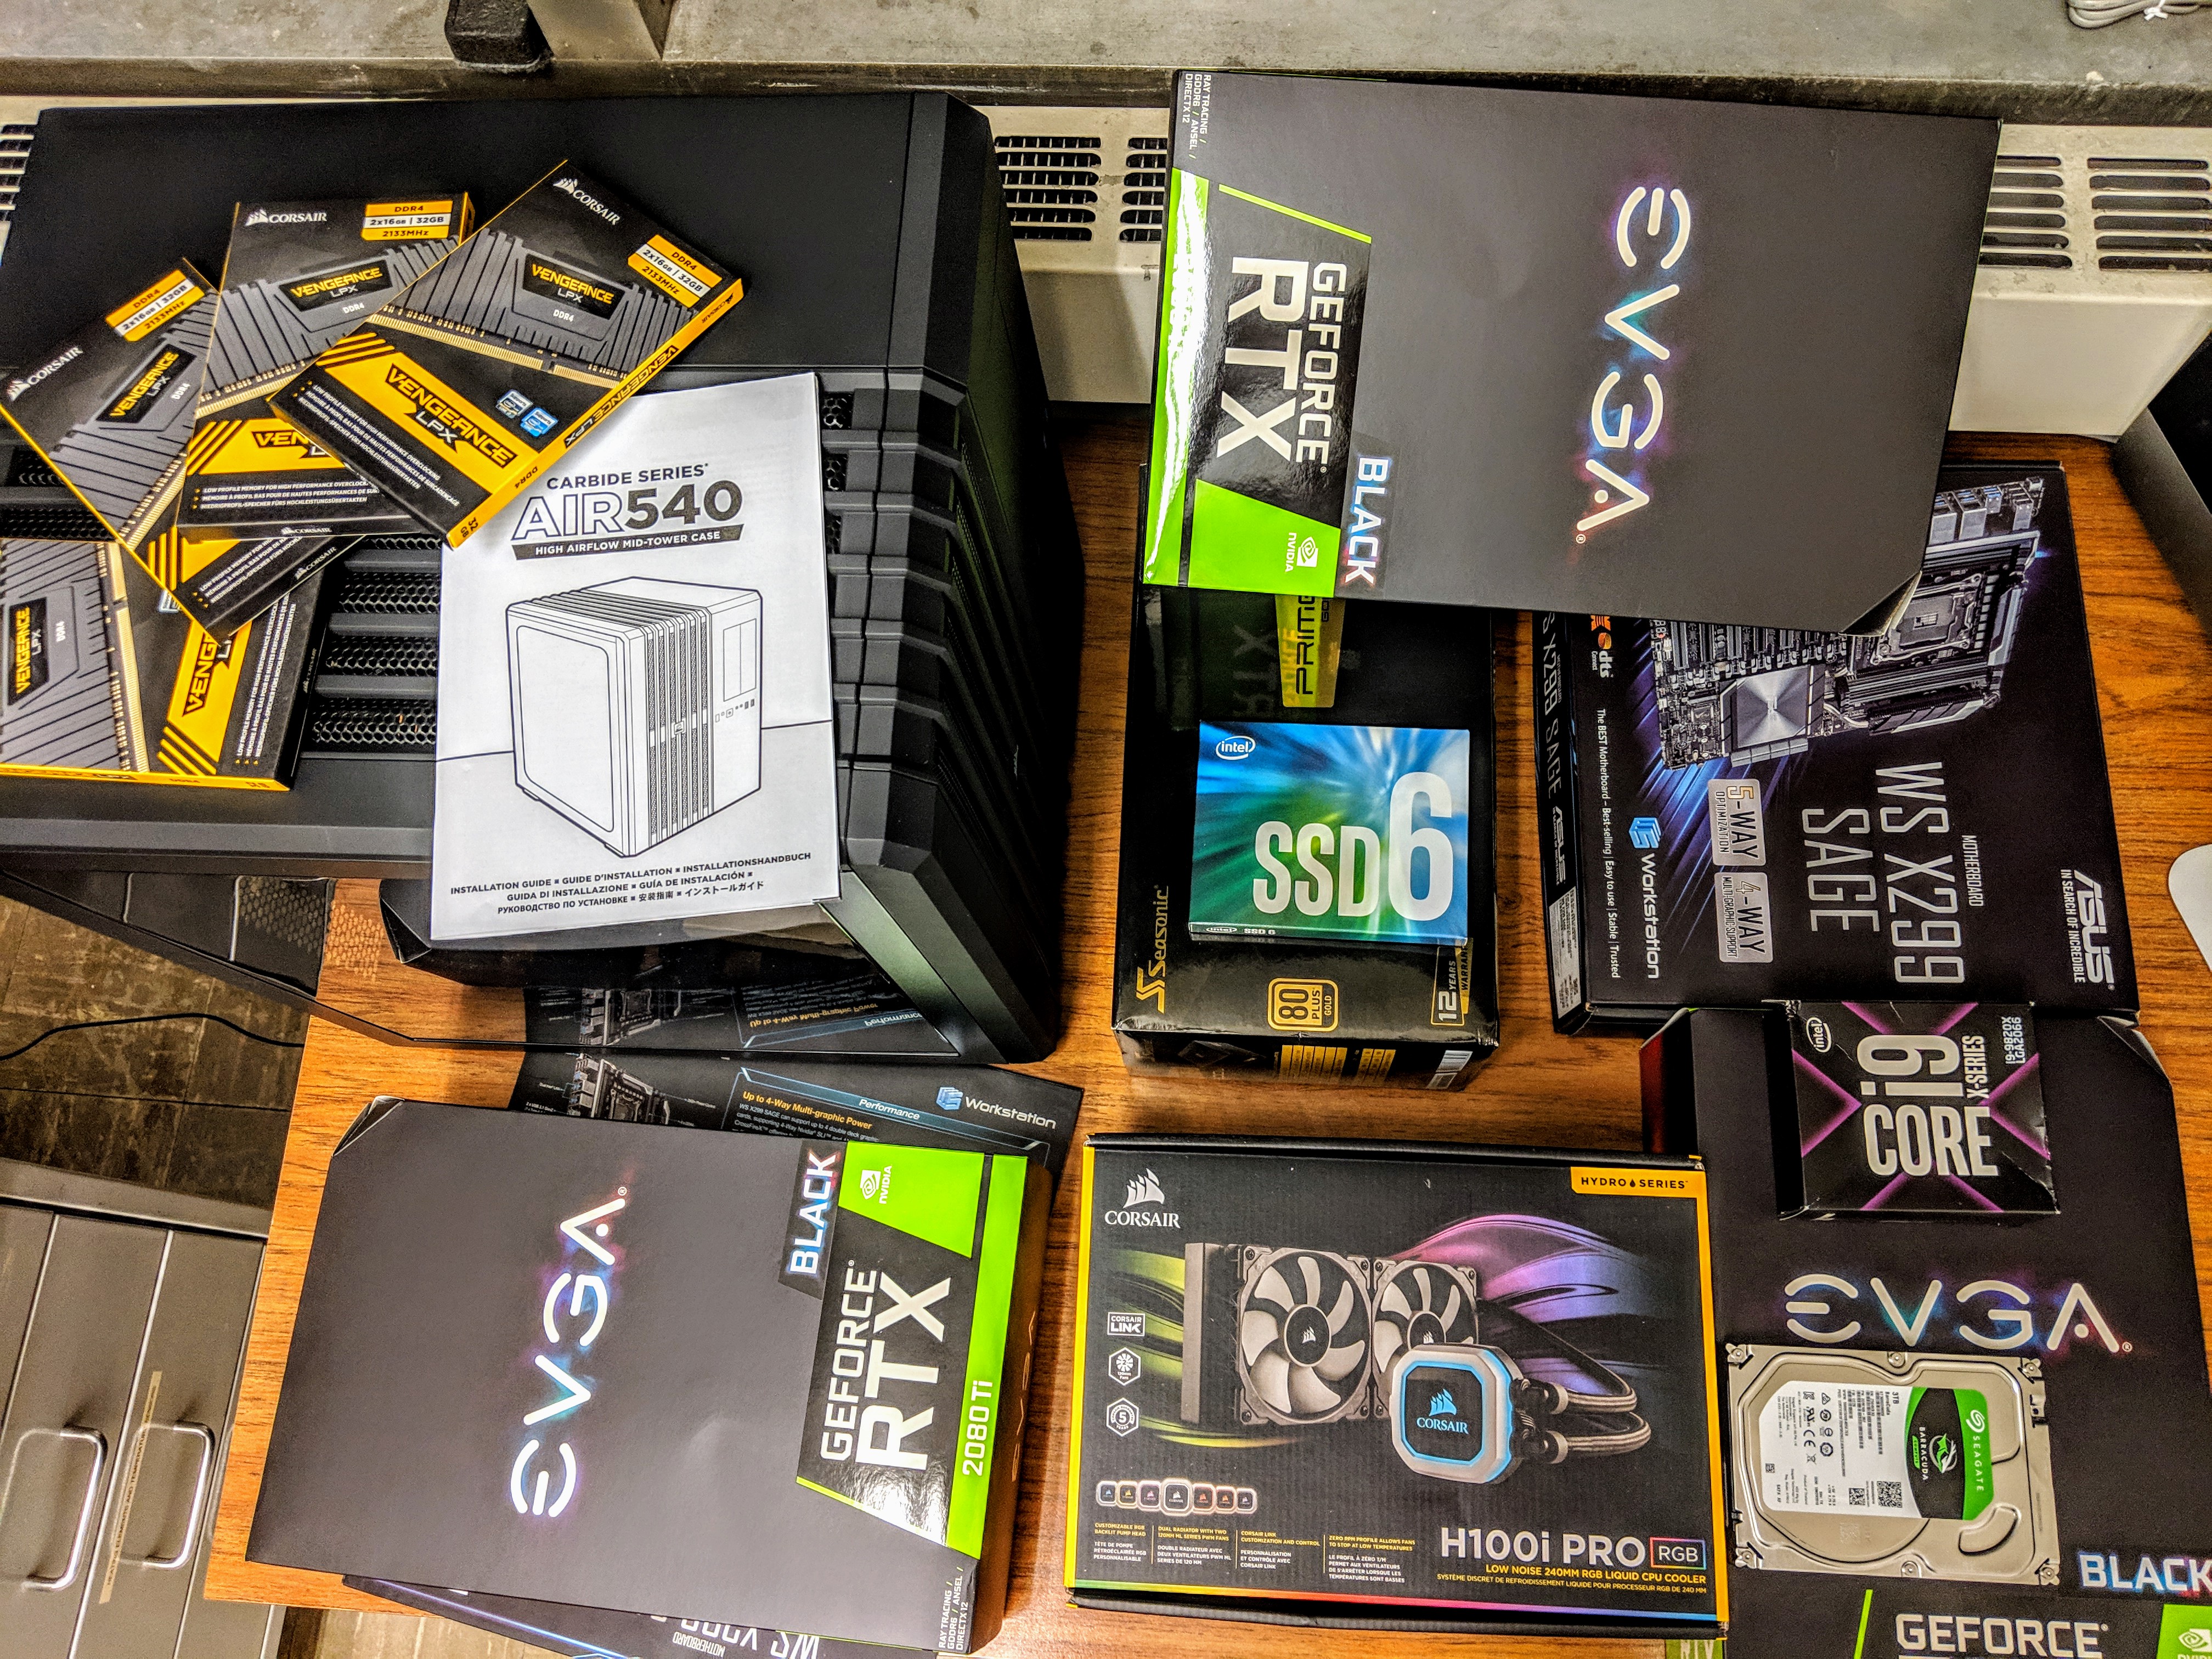
Here is each component and the price I paid (Jan 31, 2019):
Support L7 by purchasing parts via the Amazon links below (zero-added cost to you). Every little bit helps keep L7 going: thank you!
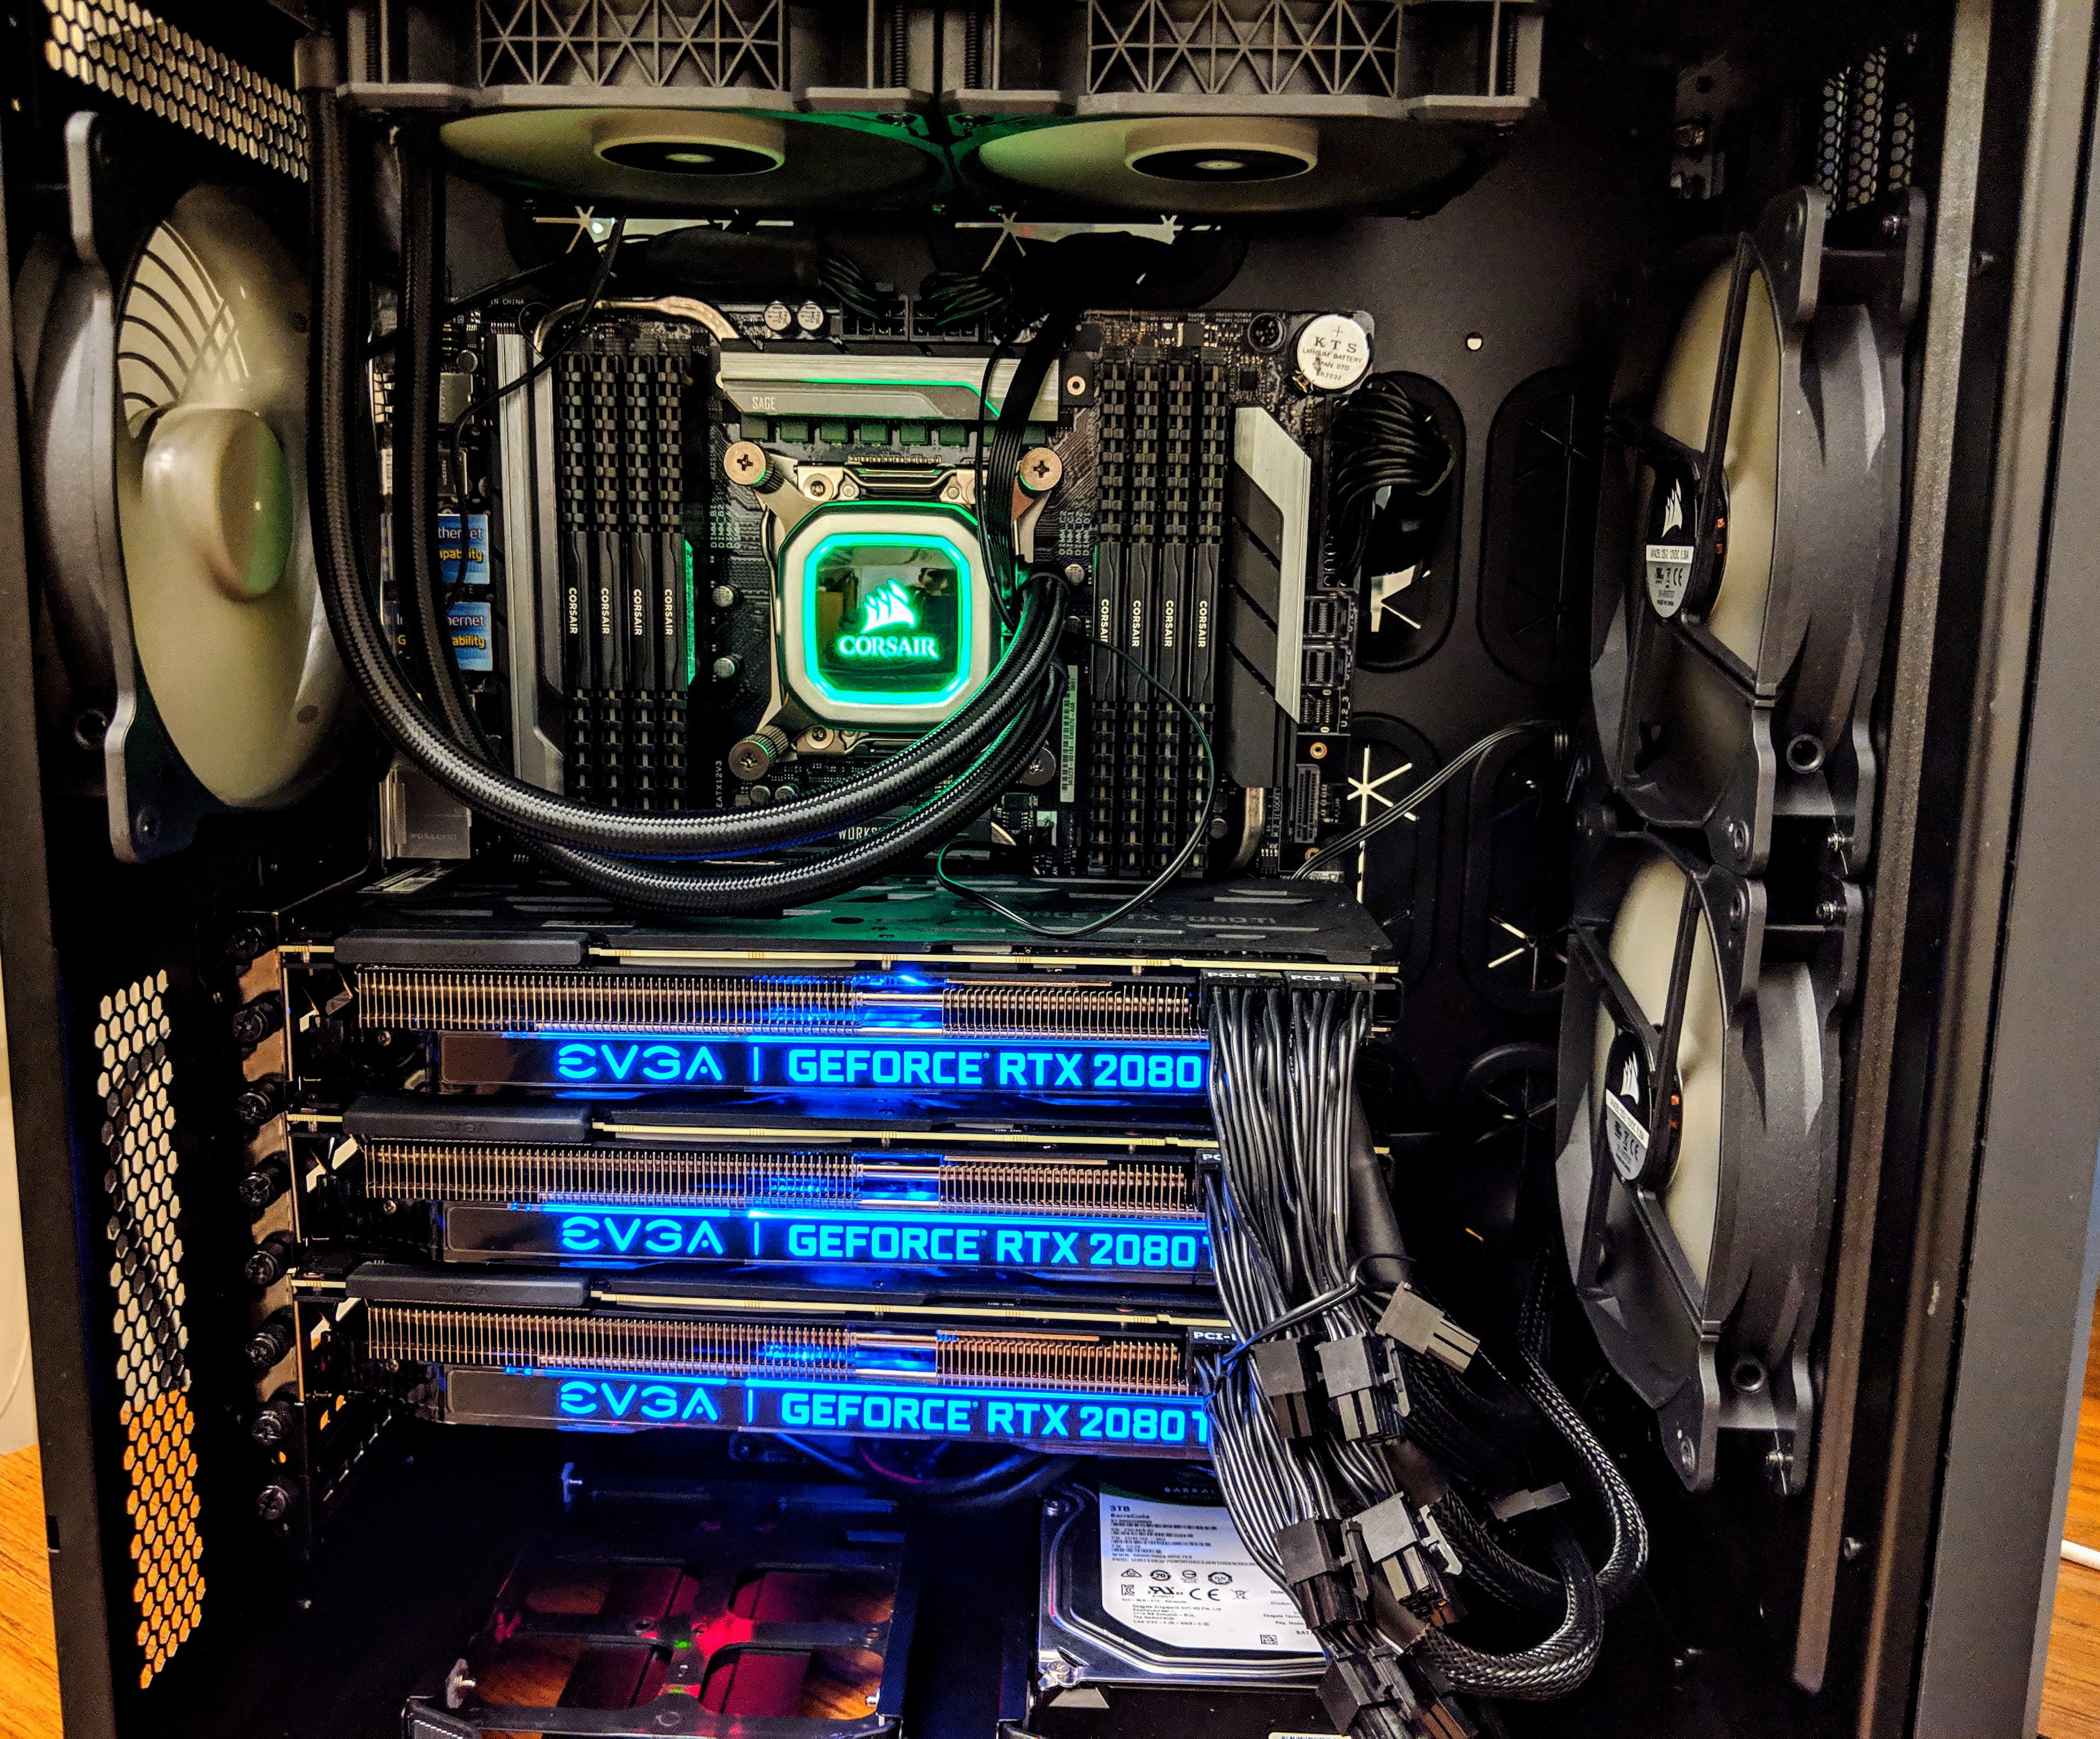
3 EVGA RTX 2080 Ti GPUs
 EVGA GeForce RTX 2080 Ti, $3570 ($1190 each)
Update: To avoid overheating, I now use these blower-style GPUs:
1. ASUS GeForce RTX 2080 Ti 11G Turbo Edition GD, $1209 (03/21/2019)
2. Gigabyte GV-N208TTURBO-11GC RTX 2080 Ti Turbo 11GB, $1399 (03/21/2019)
3. ZOTAC Gaming GeForce RTX 2080 Ti Blower 11GB, $1299 (03/21/2019)
20-thread CPU (processor)
 Intel Core i9-9820X Skylake X 10-Core 3.3Ghz, $850
X299 Motherboard (all other components attach to this)
 ASUS WS X299 SAGE LGA 2066 Intel X299, $492.26
Case (the box everything goes inside)
 Corsair Carbide Series Air 540 ATX Case, $130
Other option: CORSAIR CARBIDE AIR 740 ATX Case, $149 (03/21/2019)
2TB m.2 SSD (solid-state drive for fast-access persistent memory)
 Intel 660p Series M.2 2280 2TB PCI-Express, $280
Update: In recent builds I use these (2x faster, half storage, similar price) options:
1. HP EX950 M.2 1TB PCIe NVMe NAND SSD, $199 (03/21/2019)
2. HP EX920 M.2 1TB PCIe NVMe NAND SSD, $168 (03/21/2019)
3. Samsung 970 EVO 1TB - NVMe PCIe M.2 SSD, $250 (03/21/2019)
3TB Hard-drive (Spinning disk internal hard drive for slow-access persistent memory)
 Seagate BarraCuda ST3000DM008 3TB 7200 RPM, $85
128GB RAM (Random-access Memory)
 8 sticks of CORSAIR Vengeance LPX 16GB, $740 ($185 each)
1300W 1600W PSU (power supply)
Seasonic PRIME 1300W 80+ Gold Power, $240
 EVGA SuperNOVA 1600W P2, $347
Update: Now I use (cheaper) Rosewill HERCULES 1600W Gold PSU, $209 (03/21/19)
Warning: The 1300W PSU caused rebooting for distributed ImageNet/ResNet50 benchmarking. I’m not alone. I increased to 1600W and all issues resolved.
Cooler (Keeps the CPU from over-heating)
 Corsair Hydro Series H100i PRO Low Noise, $110
After a $280 discount via Newegg’s business account and omitting tax, the total cost for all components was $6200 (+$107 for PSU upgrade).
Considerations for Each Component
When choosing components like GPU, RAM, CPU and motherboard, there are three goals to keep in mind:
- Maximize speed and storage.
- Avoid bottlenecks between components.
- Spend less.
Below I list each component in our build and considerations for each. Components are listed in order of their performance impact on training deep learning models.
GPU
- The RTX 2080 Ti is benchmarked as the best GPU under $2500
- Get an after-market (e.g. EVGA or MSI) GPU, not the Nvidia Founders Edition
- With the RTX 2080 Ti, watch out for overheating issues.
- My build does not use blower-fan GPUs (cheaper), but blower-style may yield better performance.
The GPU is the most important component of any deep learning machine. It’s also the most expensive. You should always decide which GPU(s) you want first: everything else in your rig will depend on this decision. There are some great blog posts about choosing the right GPU for your needs.
Assuming you want a high-performance GPU, I recommend avoiding the marketing-noise and simply purchase the RTX 2080 Ti. If you want to do your own research and choose a good bang-for-your-buck GPU, then checkout videocardbenchmark.net and select the highest performing GPU in your price-range. Unless you want to pay $2500 or more, the RTX 2080 Ti is the obvious choice. For a 30% decrease in performance, you can instead buy the cheaper RTX 2080 or the older GTX 1080 Ti. Regardless of which GPU you choose, I recommend purchasing a GPU with at least 11GB of memory for state-of-the-art deep learning. This is the amount of memory of the RTX 2080 Ti.
When buying the RTX 2080 Ti, you’ll notice there are tons of brands: EVGA, Gigabyte, ASUS, MSI… These are called after-market GPUs. You can also buy the Nvidia Founders Edition directly from Nvidia. In general, avoid buying the founders edition if you want peak performance. Companies like EVGA create custom cases for the GPU to optimize performance, sometimes over-clocking the GPU. The founders edition is a first attempt and not always the best attempt. After-market GPU cases usually have one to three fans, where presumably more fans improves performance. Some of this is just marketing and you are usually okay with two fans. The main message here: buy EVGA, Gigabyte, ASUS or MSI branded after-market GPU.
Note that among options within an after-market brand, you may see different prices. Over-clocked GPUs tend to cost more, but often at some trade-off that doesn’t actually lead to better performance. You are usually okay to buy the cheapest one.
Some customers have complained about overheating issues with the RTX 2080 TI. The reason I only included three GPUs in my build was to increase airflow for cooling. If there are no issues, I’ll add a fourth RTX 2080 TI GPU.
In this build I use open-air GPUs (fans at the bottom of each GPU) only because they were low cost. Blower-style GPUs expel air out the side of the case and may yield higher performance. For the motherboard we use, the GPUs are packed tightly, blocking open-air GPU fans. If you purchase blower-style GPUs, the fans can expel air directly out of the side of the case. You can learn more about the differences here.
SSD (Solid-state Drive)
- The SSD <> GPU data transfer can be the main bottleneck for deep learning training and prediction.
- m.2 SSDs can be 7x faster than standard SSDs.
- Buy an m.2 SSD if you can afford it. You need an m.2 compatible motherboard.
Data transfer from disk to your GPU is a primary bottleneck for deep learning and can greatly reduce both train and test time speeds. m.2 SSDs are the solution. The most expensive SSDs have 3500 mb/s write speeds, versus 500 mb/s for standard SSDs.
In my build, I purchased a cheaper m.2 SSD with write-speeds around 1800 mb/s, but with high capacity of 2TB. You may find it more useful to instead buy a smaller 256 MB m.2 SSD with faster write speeds at lower cost. This is a good way to get better performance for less cost. The only caveat is you’ll need to make sure you can fit all your training data on the m.2 SSD.
Motherboard
- To support multiple GPUs, you need enough PCI-E lanes.
- This means you need a x299 (for Intel CPU) or x399 (for AMD CPU) motherboard.
- You can go cheaper here, but if you can afford it, consider workstation motherboards.
Motherboards can be tricky to purchase because there are so many options and it can be unclear why some motherboards cost so much more than others. For deep learning, the most important aspect of a motherboard is the number of supported PCI-E lanes. In my build, my motherboard has 44 PCI-E lanes. That means for three GPUs (each requiring 16 lanes), I can run two GPUs at 16 lanes and one GPU at 8 lanes (requiring 40/44 lanes). Most benchmarks show the performance difference is negligible when running a GPU on only 8 lanes instead of 16 lanes, but this may make more a difference in the future. At minimum, make sure your motherboard has enough PCI-E lanes for the minimum amount required for each GPU. So for 3 RTX 2080 TI GPUs, the motherboard needs at least 24 PCI-E lanes.
Another consideration is whether to choose an x299 (for Intel CPUs) or x399 (for AMD CPUs). Intel CPUs are faster for each single processing thread, but AMD CPUs are often cheaper than Intel CPUs for the same number of process threads. In my case, I chose to pay for both (20 threads and fast processing speed) with an Intel processor, requiring an x299 motherboard.
More reliable (and more expensive) motherboards are often called workstation motherboards. Whether the increase in reliability is worth the price is debatable. I elected for a workstation motherboard in my build, but if you want to buy a cheaper motherboard, check out the SUPERMICRO x299 motherboard which meets all the needs of my build, but costs $100 less.
CPU
- Choose Intel X-Series (x299 motherboards) or AMD ThreadRipper (x399)
- Intel CPUs are faster per thread, but AMD CPUs have more threads per dollar cost.
Choose a CPU based on your computing needs by considering these two questions:
- Do you run lots of multi-threaded jobs?
- Do you need each thread to be fast?
If (1) is “Yes,” but (2) is “No,” you can reduce costs with a 32-thread AMD Ryzen Threadripper 2950X. If the answer to (2) is “Yes,” then you likely want an Intel CPU.
For Intel CPUs, you need core Intel X-Series CPUs for multi-GPU deep learning. Only the X-series CPUs work with the x299 motherboards, and you need the x299 motherboards to have enough PCI-E lanes to support multiple GPUs. If you only use two GPUs, you can reduce motherboard+CPU costs with the cheaper 300-series Intel CPUs and an LGA 1151 motherboard (instead of x299). This will run one GPU on 16 PCI lanes and the other on 8 lanes (most LGA 1151 motherboards have 24 PCI-E lanes, but double check this).
Case / Box
- Choose a case that fits your motherboard (ATX is standard, mini-ATX is smaller).
- Choose a case with space for airflow to keep the GPUs cool.
- Carbide Series™ Air 540 High Airflow ATX Cube Case is a safe bet for deep learning.
For multi-GPU workstations, airflow and cooling is everything. Choose a case that fits your motherboard. Most motherboards that take multiple GPUs are likely ATX, so you’ll want a case that fits the ATX motherboard. If you’re note sure which case to buy, Carbide Series™ Air 540 High Airflow ATX Cube Case is a safe bet.
Spinning-disk Hard-drive
- Buy a 7200 RPM spinning disk if your m.2 SSD doesn’t fulfill your storage needs.
If your m.2 SSD is too small for your persistent storage needs, you’ll want to buy a spinning disk hard drive. These are fairly cheap and come in 5400 RPM (slower) and 7200 RPM (faster) speeds. RPM stands for rotations per minute and these disk physically spin inside your computer which means they can be noisy. Because they are low cost, you probably want a 7200 RPM disk.
RAM
- Buy low-profile RAM to make sure it fits in your case.
- Avoid brands you’ve never heard of.
The main considerations for RAM are amount, physical size, and latency. In my build, I have 128 GB of RAM, but you can cut costs with 64GB or 32GB based on how large your datasets are. In general, I recommend purchasing 128 GB of RAM if you can afford it so that you can load entire datasets into memory and avoid the hard-drive <> RAM bottleneck every epoch while training deep learning models.
For multi-GPU rigs, be sure to buy low-profile RAM (physically smaller casing). You can think of the profile as the height of the RAM. You will be fitting a lot of things on your motherboard and sometimes RAM with large casing blocks other components. Corsair Vengeance is a good low-profile RAM. Note that for length of RAM, for desktops, you usually want 288-pin RAM.
Remember to pay attention to your motherboard documentation if you don’t use all the RAM slots. The placement of RAM into RAM slots does matter! Your motherboard and motherboard documentation usually show you exactly where to put RAM depending on how many sticks you have.
PSU (power supply)
- Make sure your PSU can supply enough power. There are PSU calculators online.
- Each RTX 2080 Ti requires around 300W of power.
- Choose full-modular because less wires = more airflow.
- My 1300W PSU caused rebooting at max load. 1600W worked for this build.
You may see gold PSU versus platinum PSU. This refers to an efficiency certificate rating (not the metal) of the PSU where platinum > gold > silver > bronze > basic relates to the efficiency of the PSU. For example, a bronze PSU draws more power from the wall socket than a platinum PSU, for the same amount of computation. If reducing electricity costs (and being environmentally friendly) is of concern, consider purchasing a platinum or gold rated PSU.
For this build, I originally purchased a Seasonic PRIME 1300W PSU, but I struggled with rebooting when I maxed out all GPUs at the same instant while intializing distributed PyTorch ImageNet/ResNet50 training. I switched to the EVGA SuperNOVA 1600 P2, and these issues resolved. Note, I was able to get the 1300W working by using $ sudo nvidia-smi -pl 180 to throttle the GPU power down from 250W to 180W. This can work for you, but I recommend getting the 1600W PSU as this limits your GPU speed.
Cooling System
- Good airflow and proper cable management are often sufficient for GPU cooling.
- The Corsair h100i is a safe bet for high-performance (i9 X-Series) CPU cooling.
- If possible, keep the machine in a cool, air-conditioned room.
There are many options for cooling from case fans to full-system water cooling. In general, if you have a large case and proper cable management then you don’t need anything too fancy. In my build, the CPU did not come with a cooler and I use the Corsair h100i which is fairly standard in deep learning rigs. A cheaper option might be the Noctua NH-U9S CPU Cooler Fan. The reasons I did not purchase this fan is because it is very large and I wasn’t sure if it would block some of my RAM slots. If you only use 32 GB RAM, then this cooler could work as a cheaper option.
Benchmarking vs Google Compute Engine
I benchmarked this machine versus a Google Compute Engine (GCE) Deep Learning VM. These are pre-built VM’s that are claimed to be specially “optimized for deep learning.” GCE Deep Learning VM’s use versions of CUDA and source-built drivers that are optimized for their hardware architectures. GCE VM’s don’t have Nvidia RTX 2080 Ti GPUs, so I set up my VM with Tesla K40s. Depending on the benchmark task, the Nvidia RTX 2080 Ti performs 2x to 4x better than the GPU Tesla K40. So to make it a fair fight, I compared one RTX 2080 Ti on this rig versus four Tesla K40s on the GCE VM.
To benchmark, I used PyTorch’s Imagenet Distributed Example. I downloaded the ImageNet 2012 train and validation sets and ran this line of code on both my machine and the GCE Deep Learning VM:
python examples/imagenet/main.py -a resnet18 --lr 0.1 --dist-url 'tcp://127.0.0.1:FREEPORT' --dist-backend 'nccl' --multiprocessing-distributed --world-size 1 --rank 0 "/location/where/I/stored/imagenet/"
GCE Deep Learning VM specs
For the virtual machine I created, the specs were:
- Architecture: 64bit , x86_64
- Number K40 GPUs: 8
- Storage: 394 GB
- RAM: 172 GB
- Number CPU threads: 24
ImageNet Training Time Benchmark
Comparing the time for one epoch:
- Per one RTX 2080 TI on this rig: 37.5 minutes
- Per four Tesla K40 GPUs (equivalently two K80s) on GCE VM: 86.3 minutes
The values are averaged over 50 epochs training. The same (above) line of code was run. No other processes were running on either machine.
GCE Cost per Epoch
For the GCE architecture I used, with full acknowledgement that this is not the most cost-efficient set-up, training costs were:
- $12.77 per epoch per four Tesla K40 GPUs
So training ImageNet for 100 epochs would cost around $1277 just for the GPUs. For the entire VM, costs were around $21 per hour.
Comparison with Lambda’s 4-GPU Workstation
The build I’ve described is intended to optimize the cost/performance trade-off. If you’d like to match Lambda’s 4-GPU workstation build more exactly, Lambda’s CEO Stephen Balaban was kind enough to share the following changes on Reddit:
- Add an additional
$1,349$1,199 blower-style GPU Add $159 to upgrade the 3 GPUs to blower: $477(blower same price as of 3/13/19 on Newegg/Amazon)- Add a hot swap drive bay: +$50
- Using the 1600W Rosewill Hercules PSU: $-31
- Upgrade CPU from 10 cores to 12 cores: $189
- $6,200 base + $1407 adjustments
With these adjustments, the total cost of Lambda’s workstation would be around $7,607: ~$4,500 less than the 4-GPU Lambda rig.
Miscellaneous
The operating system I’m using is Ubuntu Server 18.04 LTS. I’m using Cuda 10.1 with TensorFlow (installed from source) and PyTorch. I notice a 5%-20% performance hit due to thermal throttling on the top-most GPU when I utilize all three GPU’s at maximum capacity for an extended period of time. This is likely due to the dual fan GPUs. I recommend using blower-style GPUs to avoid thermal throttling.
Acknowledgements and Disclaimers
A big thanks to Anish Athayle, Xander Breg, the comments on Reddit, and Newegg customer service (e.g. Derek Liu) for their guidance.
Comments